Capcom Mini Cute Clones: Difference between revisions
Wigsplitta (talk | contribs) No edit summary |
Wigsplitta (talk | contribs) |
||
| (8 intermediate revisions by the same user not shown) | |||
| Line 1: | Line 1: | ||
{{Infobox cabinet | {{Infobox cabinet | ||
|name = Capcom Mini Cute | |name = Capcom Mini Cute Clone | ||
|kana = キュート | |kana = キュート | ||
|romaji = KYUUTO | |romaji = KYUUTO | ||
| Line 6: | Line 6: | ||
|image = Cute_Clone.jpg | |image = Cute_Clone.jpg | ||
|type = Sitdown | |type = Sitdown | ||
|year = | |year = 2018-present day | ||
|depth = 690 | |depth = 690 | ||
|width = 500 | |width = 500 | ||
| Line 46: | Line 46: | ||
==References== | ==References== | ||
https://forum.arcadeotaku.com/viewtopic.php?t=37653<br> | |||
https://www.arcade-projects.com/threads/pre-order-for-mini-cute-production.11229<br> | |||
https://forum.arcadeotaku.com/viewtopic.php?t=46229<br> | https://forum.arcadeotaku.com/viewtopic.php?t=46229<br> | ||
https://www. | https://www.facebook.com/VortexArcadeFR/posts/pfbid0pSmaeDpHSWErdKB3jz9VftuFJVmK3AL2eZ5E9AzjKXntbmtYdGykYxXFw8724snl<br> | ||
== Monitor Rotation == | |||
[[File:Cute_Clone_Rotation_2.jpeg|100px|thumb|right]] | |||
[[File:Cute_Clone_Rotation_1.jpeg|100px|thumb|right]] | |||
Rotating the monitor is considerably easier than some cabinets thanks to a smaller screen size / lighter weight, all in one monitor and chassis frame, and minimal connectors. <br> | |||
Connections will likely differ for the various versions of the clone. For the Vortex, the following procedure is applicable:<br> | |||
*Unplug cab from power socket | |||
*Remove the back panel and unplug the 2pin fan connector | |||
*Unplug the 9 pin connector (circled in photo) and remove the cable from any cable tidy clips | |||
*The monitor and chassis are now no longer connected to the cabinet | |||
*Unscrew the four bolts (circled in photo) that secure the monitor frame to the cabinet (note there are clear rubber washers that are difficult to see) | |||
*Remove monitor from cabinet. Ideally remove the monitor completely and lay it down. This allows you to get a good grip in the rotated position when putting it back in | |||
*Carefully place the monitor back inside the cab | |||
*Fasten the four bolts and washers | |||
*Gently remove the bezel and rotate (no screws/bolts, just flexing the plastic allows it to come free) | |||
*Reconnect the 9 pin connector | |||
*Double check all connections and make sure no cabling has been caught or other connections knocked | |||
*Reconnect the fan (if required) | |||
*Replace and screw in the back panel | |||
==External Links== | ==External Links== | ||
Latest revision as of 14:59, 14 July 2025
| Capcom Mini Cute Clone | |
|---|---|
 | |
| Katakana | キュート |
| Rōmaji | KYUUTO |
| AKA | Mini-Cute, Minicute |
| Type | Sitdown |
| Released | 2018-present day |
| Dimensions | 690 x 500 x 1300 mm |
| Wiring | JAMMA |
| Monitor | 18 in 15 kHz (Various) |
| Rotatable | Yes |
| Weight | 60 kg |
| Power Supply | Various |
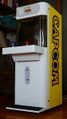
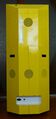
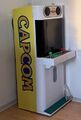
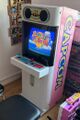
The Capcom Mini Cute is a popular cabinet, but due to scarcity and a high price tag various clones have come onto the market. The first was released by TRFightstick (no longer produced) which did not include a monitor or chassis. Clones then started appearing from various sellers on AliExpress/Alibaba etc that did include a CRT monitor and chassis. Most recently, Vortex arcade released a clone that also included an 18" CRT monitor and revised chassis.
Gallery
-
 TRFightstick
 -
 TRFightstick
 -
 TRFightstick
 -
 AliExpress
 -
 Vortex Arcade
 -
 Vortex Arcade
 -
 Vortex Arcade
 -
 Vortex Arcade
 -
 Vortex Arcade


Artwork
Notes
CRT is a 47cm/18inch tube.
References
https://forum.arcadeotaku.com/viewtopic.php?t=37653
https://www.arcade-projects.com/threads/pre-order-for-mini-cute-production.11229
https://forum.arcadeotaku.com/viewtopic.php?t=46229
https://www.facebook.com/VortexArcadeFR/posts/pfbid0pSmaeDpHSWErdKB3jz9VftuFJVmK3AL2eZ5E9AzjKXntbmtYdGykYxXFw8724snl
Monitor Rotation


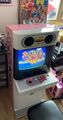
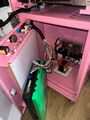
Rotating the monitor is considerably easier than some cabinets thanks to a smaller screen size / lighter weight, all in one monitor and chassis frame, and minimal connectors.
Connections will likely differ for the various versions of the clone. For the Vortex, the following procedure is applicable:
- Unplug cab from power socket
- Remove the back panel and unplug the 2pin fan connector
- Unplug the 9 pin connector (circled in photo) and remove the cable from any cable tidy clips
- The monitor and chassis are now no longer connected to the cabinet
- Unscrew the four bolts (circled in photo) that secure the monitor frame to the cabinet (note there are clear rubber washers that are difficult to see)
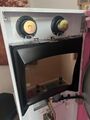
- Remove monitor from cabinet. Ideally remove the monitor completely and lay it down. This allows you to get a good grip in the rotated position when putting it back in
- Carefully place the monitor back inside the cab
- Fasten the four bolts and washers
- Gently remove the bezel and rotate (no screws/bolts, just flexing the plastic allows it to come free)
- Reconnect the 9 pin connector
- Double check all connections and make sure no cabling has been caught or other connections knocked
- Reconnect the fan (if required)
- Replace and screw in the back panel
External Links
- Side art
- Speakers
- Coin reject
- Control Panel Overlay*
- Control Panel Overlay*
- Warning labels sticker set
*CPO should fit all models, but button/stick placement will be unlikely to match up correctly so it is advised to order an uncut overlay if available