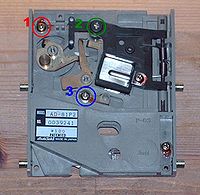
AD-81P Coin Acceptor
Adjusting an AD-81P/AD-81P2 Coin Acceptor


This validator can take coins of diameter: 21.0mm-27.5mm, thickness: 1.0mm-2.0mm. However, they are fitted with a part (see [5]) that restricts the minimum coin diameter and is manufactured to different sizes depending on the diameter of the intended coinage. The diameter may be engraved into the part e.g. a "P-42" is 25.5mm and used for HK $1 and may only be suitable for use with a UK 2-pence coin post-conversion, or 10-pence if bent. 50 or 100 Yen might be more suitable for 20-pence pieces. Bear in mind that you will only be able to make limited adjustments (+/- 8%) to the minimum width.
The first thing to do before adjusting anything is to ensure that the coin will actually reach the coin validator within your cab. i.e. will it go through the coin slot?
Now to the validator itself. This is an entirely mechanical device and the worst thing you can possibly do is stop it from validating the coins that it was intended for, so no big loss if you don't have any Japanese coins!
There are just two things you need to take into account whilst making adjustments. The diameter of the coin, and it's thickness.
- This controls the diameter of the coin on entry to the validator. For home use it's recommended to remove this altogether, but if your coin passes unhindered, by all means leave it there.
- This adjusts for the thickness of the coin. Turn the screw clockwise and this allows for a thicker coin and vice versa. To set this, turn the screw all the way counter clockwise, drop the coin in, and turn clockwise slowly, stopping when it drops through.
- Another adjustment for the coin diameter. Probably the most difficult adjustment to make, and certainly the most time consuming one. The idea is to deliver the coin onto the nylon/plastic guide such that it doesn't stick in the mech (too far to the right), and continues along the guide and is dropped right onto the coin actuator. If this doesn't happen then either you have set [3] too far to the left or you need to move on to the next adjustment.
- The final, rarely needed adjustment is to allow your coin to drop through onto the actuator. You may need to move this to the right to allow for a different diameter coin.
- The two "pins" highlighted need to "grab" the coin as it drops in and pass it through to the chute to activate the credit switch. If the coin is too small it will simply drop straight through to the coin return receptacle. To make adjustments for the minimum diameter of the coin, bend the upper right pin in the pic above until the coin sits snugly between the two pins. Gravity will then rotate the coin, and deliver it to [2].
Coin diameter references